EUR/JPY is showing early signs of a momentum shift after a choppy stretch of trading.
A closely watched short-term moving average has just moved back on top of a slower baseline, hinting that buyers may be regaining control.
While the move is not dramatic on the day, the positioning of price relative to recent ranges makes this alert worth a closer look.
Welcome to “TA Alert of the Day.” Each day after the market close, MarketMilk scans for popular technical indicator alerts. We use these alerts as the basis for a mini-lesson, breaking down what each alert means, why it matters, and how traders might interpret it. The goal is to help beginner traders not only spot these alerts but also understand the logic behind them and how they can inform trading decisions.
What MarketMilk Has Detected
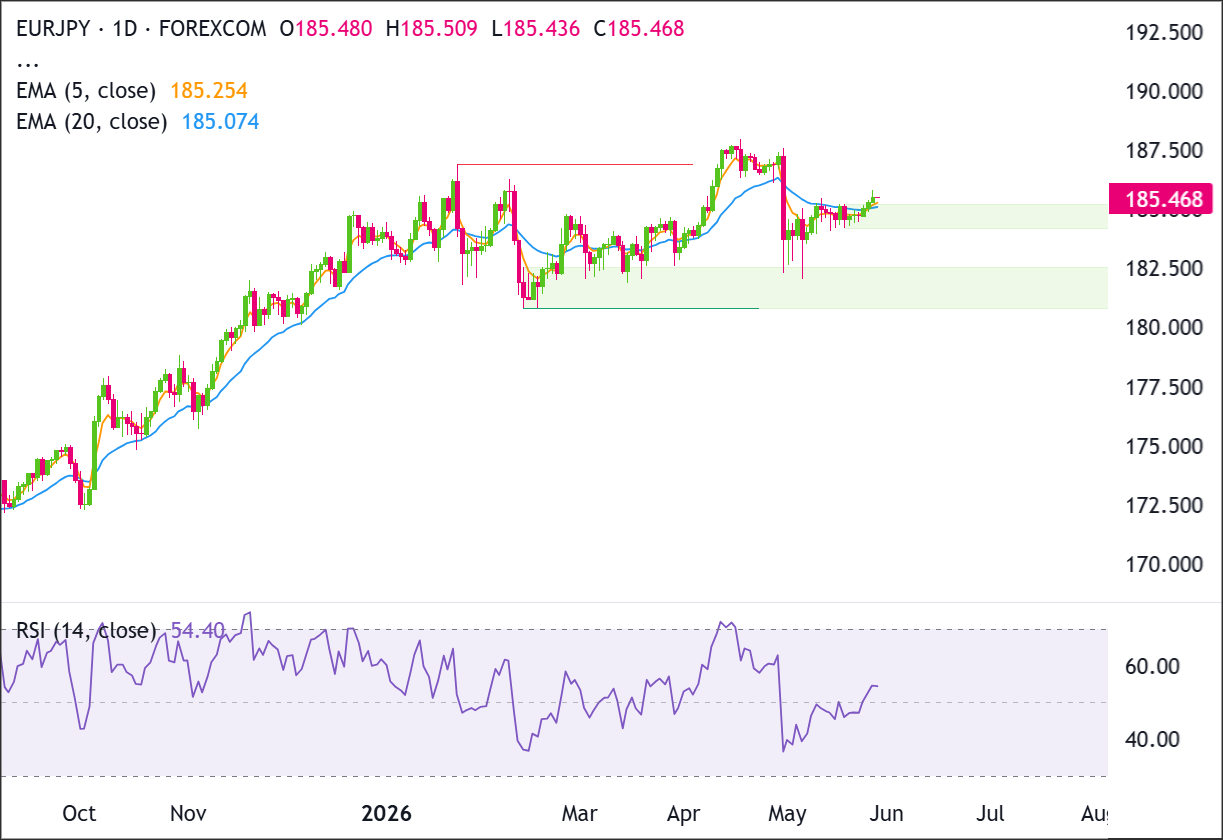
MarketMilk detected a bullish 5 EMA/20 EMA crossover on EUR/JPY, where the fast EMA(5) moved above the EMA(20).
This development comes after a notable drawdown from late April, when EUR/JPY sold off sharply from the 187.50–187.70 area to lows near 182.30.
Since that drop, price has stabilized and worked back into the mid-185s, with recent closes holding above the 184.40–184.70 zone that has acted as a short-term pivot during May.
What This Signals
Traditionally, a 5 EMA crossing above the 20 EMA suggests that short-term price action is improving relative to the intermediate trend.
If the move is sustained, this configuration can attract trend-following participation and often marks a transition from consolidation into a potential continuation push, particularly when price can stay above both averages.
However, this same pattern can also represent a late or lagging confirmation after price has already bounced.
In that case, the crossover sometimes coincides with a point where upside momentum pauses, and EUR/JPY can slip back into the prior range.Especially if the pair fails to clear nearby resistance around 185.80–186.20 (recent highs and congestion) or if the prior breakdown zone near 186.60–187.30 continues to cap rallies.
Alternatively, if the broader structure remains corrective after the April drop, the crossover may become a whipsaw signal, where prices briefly improve, the EMAs cross, and then re-cross as the pair returns toward support.
That risk tends to increase when daily candles remain overlapping and when momentum is driven more by short-lived bursts than persistent trending.
The outcome depends heavily on follow-through in daily closes, where price sits relative to both EMAs, and how EUR/JPY behaves around nearby support/resistance zones.
How It Works
Exponential moving averages (EMAs) weight recent prices more heavily than older prices, making them responsive to changes in momentum.
The EMA(5) tracks very short-term direction, while the EMA(20) represents a smoother intermediate baseline.
A bullish crossover occurs when the faster EMA rises above the slower EMA, indicating that recent price action is strengthening relative to the recent trend.
Because moving averages are derived from prior closes, crossovers are inherently lagging: they confirm a shift that has already begun rather than predicting it.
They tend to perform better in clean trends and can generate false signals when the market is range-bound or mean-reverting.
Important: EMA crossovers can look compelling right at the crossover point, but reliability improves when price holds above the averages and when the spread between EMA(5) and EMA(20) begins to widen (instead of immediately compressing again).
What to Look For Before Acting
Do not assume the uptrend will continue. Consider these factors:
✅ Daily closes holding above both EMA(5) and EMA(20), not just intraday spikes
✅ Evidence the EMAs begin to separate (rising slope in EMA(20) and a widening gap)
✅ A clean push/close above near resistance around 185.8–186.2 (recent highs/congestion)
✅ How price reacts if it revisits the 184.40–184.70 area (recent pivot support)
✅ Whether the rally can reclaim parts of the prior supply zone near 186.60–187.30 (pre-selloff region)
✅ Fewer overlapping daily candles (a sign that conditions are shifting from range to trend)
✅ Confirmation on a Weekly view (trend structure and where price sits vs. broader swing levels)
✅ Macro catalysts: upcoming ECB/BoJ messaging, inflation prints, and risk-sentiment drivers that often impact JPY crosses
Risk Considerations
⚠️ Whipsaw risk if EUR/JPY remains stuck in a post-selloff range (fast/slow EMAs can re-cross quickly)
⚠️ The crossover is lagging and may occur after much of the rebound has already played out
⚠️ Nearby overhead resistance around 185.80–186.20 and 186.60–187.30 can trigger pullbacks or failed breakouts
⚠️ Event risk from central bank communication can override technical setups in JPY pairs
⚠️ A drop back below the 184.40–184.70 pivot zone could quickly shift the chart back toward a neutral-to-bearish posture
Potential Next Steps
Consider keeping EUR/JPY on a watchlist for follow-through rather than treating the crossover as a standalone trigger.
Momentum has improved, but price still needs to prove it can clear 186.00. Sellers need a daily close back below 184.00 to show the recovery is failing.
Consider this signal only with a risk management plan: set a clear invalidation level using nearby price structure, such as a break below the recent pivot zone, and watch whether the EMA gap widens and the EMA slopes continue to improve.
If price action turns choppy again, it may be a cue to stand aside until the daily trend becomes clearer.
Trade Idea: Bullish Continuation Scenario
Setup
The bullish setup is based on EUR/JPY holding above the reclaimed 184.00–185.20 support zone and continuing its recovery toward the prior swing-high area.
Buyers have already pushed price back above the EMA cluster near 185.00–185.25, so the next confirmation would be a daily close above 186.00. If that happens, price can make a cleaner attempt to retest 186.80–187.50.
Entry
Consider entering long on a daily close above 186.00, confirming that buyers are breaking out of the recent structure.
Alternatively, enter on a controlled pullback into 184.00–185.20 if price stabilizes there and turns back higher.
If price loses that support zone and closes decisively below 184.00, stand aside and wait for either deeper support to form or a cleaner breakout later.
Stop Loss
For breakout entries: stop on a daily close back below 185.20. That would invalidate the breakout by showing price could not stay above the former ceiling.
For pullback entries: stop on a daily close below 184.00. That would invalidate the support-hold idea and show buyers are no longer defending the zone.
Take Profit
Target 187.50, because that is the next clear upside area on the chart and the most natural place for price to retest if the current recovery continues.
At 187.50, you can either fully exit or take partial profits and trail the remaining position using confirmed swing structure.
A structure-based trailing method would be to wait for EURJPY to form a new higher low after the breakout, then trail below that confirmed higher-low zone.
For example, if price breaks through 187.50 and later builds support, the runner can be trailed below that new support structure to stay with the trend while still protecting open profit.
Bottom Line
The bullish case improves if EUR/JPY can close above 186.00 while continuing to hold above 184.00–185.20.
That would confirm buyers are extending the recovery and opening the door for a move back toward 186.80–187.50.
The key invalidation level is 184.00. A daily close below 184.00 would weaken the bullish structure and suggest the current rebound has failed.
Trade Idea: Bearish Pullback Scenario
Setup
The bearish setup is based on EURJPY failing near 186.00 or the larger 186.80–187.50 resistance zone, then losing the reclaimed support area.
Price has recovered from the May selloff, but if buyers cannot extend above resistance, the move may turn into a lower-high attempt.
Sellers would gain control on a daily close below 184.00, which would break the current support zone and expose the deeper demand area at 180.80–182.50.
Entry
Consider entering short on a daily close below 184.00, confirming that the support zone has failed.
Alternatively, if price pushes into 186.80–187.50 and prints a clear bearish rejection candle, enter short on the next daily close back below 186.00.
If price instead breaks and closes decisively above 187.50, stand aside, as that would invalidate the bearish pullback idea.
Stop Loss
For breakdown entries: stop on a daily close back above 185.20. That would invalidate the breakdown by showing price has reclaimed the support zone.
For rejection entries near resistance: stop on a daily close above 187.50. That would invalidate the bearish idea by confirming buyers have pushed through resistance.
Take Profit
Target 180.80 because that is the next major support area below the current structure and the most likely place where buyers would try to step back in.
At 180.80, you can either fully exit or take partial profits and trail the remaining position using confirmed swing structure.
A structure-based trailing method would be to wait for EURJPY to form a new lower high after the breakdown, then trail above that confirmed lower high zone.
For example, if price breaks below 180.80 and later rejects a retest of 180.80 from underneath, the runner can be trailed above that new resistance structure to stay with the trend while still protecting open profit.
Bottom Line
The bearish case depends on EUR/JPY failing below 186.00 or rejecting the 186.80–187.50 resistance zone.
A daily close below 184.00 would confirm that sellers have broken the current recovery structure.
The downside target would be 180.80–182.50. The bearish idea is invalidated if price closes decisively above 187.50, because that would confirm a breakout through the major resistance zone.
This content is strictly for informational purposes only and does not constitute as investment advice. Trading any financial market involves risk. Please read our Risk Disclosure to make sure you understand the risks involved.